Hello and welcome to my website!
On kaenner.de, I share my passion for DIY projects. Whether it's practical 3D-printed enclosures for Raspberry Pi boards, CNC modules, or my very own "Picosplit" custom keyboard: here you'll find detailed step-by-step guides and links to the corresponding STL files to easily build them yourself. Have fun browsing and making!
Especially handy: A PDF file with all the steps is available to download for every project. This allows you to easily take the instructions with you and work offline – for example, right at your workbench or in your workshop.

Badger 2040 Enclosure
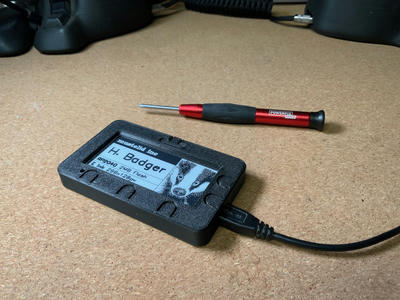
This is my version of a 3D printable enclosure for the Badger 2040. A hackable, programmable badge with E-Ink® display powered by the Raspberry Pi RP2040. This exceptionally affordable badge is sold by Pimoroni: Badger 2040
The enclosure consists of only two plastic parts which are easily printable without support on any 3D printer.
In addition to the plastic parts, you only need four 2 mm (pointed) screws with a length of 10 mm and optionally two magnets, each with a diameter of 10 mm and a thickness of 2 mm.
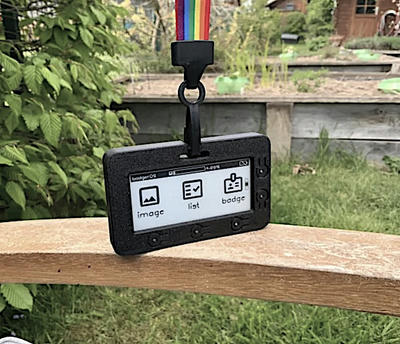
All connections are still accessible. Any cables you might want to connect can be routed to the centre of the back of the badge. This way you have one place where all the cables come out. In combination with the magnets, the badge can be used as a display for all kinds of projects. Of course, you can still use the badge as a badge, because the hole for the strap is also there. I especially like the barely visible buttons on the front of the badge.
STL-Files are hosted on printables
2 mm screws, which you can also use for other projects, can be found here: M2 self-tapping screws
Magnets are available here: 10x2 mm Neodym Mini Magnets

Badger 2040w Enclosure
This is my version of a 3D printable enclosure for the Badger 2040w. A hackable, programmable badge with E-Ink® display powered by the Raspberry Pi RP2040. This exceptionally affordable badge is sold by Pimoroni: Badger 2040w
The case has the following features:
All buttons are accessible (five buttons on the front and two buttons on the back)
- Optionally, use magnets to make the case stick to magnetic surfaces (e.g. on a refrigerator). You can also use the magnets to attach other add-ons to the case. There are notches on the back to align the case with an add-on.
- The cutout for the display always looks good, even if the e-paper display is not always in the same place.
- You can modify the case yourself because STEP files are included.
The case consists of a few plastic parts which are easily printable without support on any 3D printer. In addition to the plastic parts, you only need four 2 mm (pointed) screws with a length of 10 mm and optionally two magnets, each with a diameter of 10 mm and a thickness of 2 mm.

Badger 2040 Keypad
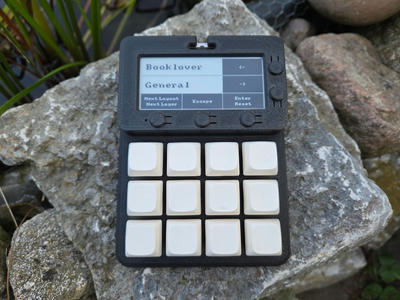
The Badger 2040 keypad is an inexpensive programmable USB macro keypad with keymap display. The firmware is based on CircuitPython and can be easily extended by yourself.
If you just want to customize key bindings, you don't even need to know how to program, as there is a configuration file for this that you can easily edit in a text editor. Since the firmware is an extension of my PicoSplit firmware, it offers the possibility to assign multiple functions to keys. You can store key assignments for several programs and each program can also have several key assignments. You can easily switch between programs and their key assignments.
You can output keystrokes depending on how long you press a key. This allows you to get by with only a few keys. For example, to go back and forth in the list of key layouts you only need one key. A short press jumps to the next layout. A longer press jumps to the previous layout.
Badger only
If you just want to try it out on your badge, you can find the firmware on GitHub: Badger 2040 Keypad Firmware
If you need more keys
If you need more keys than the five on the badge, and you have a 3D printer, then I have something for you: an extension with 12 mechanical keys. You can use regular sized MX-keys (right picture) as well as the low profile keys from Kailh (left picture). The whole thing is wired by hand, but it's really easy to make.
The badge is held magnetically on the keypad and can be easily attached or removed, because Pogo Pins are used for the electrical connection. You can even do this while the badge is connected to the computer.
The badge will then automatically switch to the appropriate mode. When plugged in, it shows the keyboard mapping of the additional keys and when operated without the external keyboard, it shows the mapping of its built-in keys.

CNC GRBL 32bits board V2.0 LCD enclosure
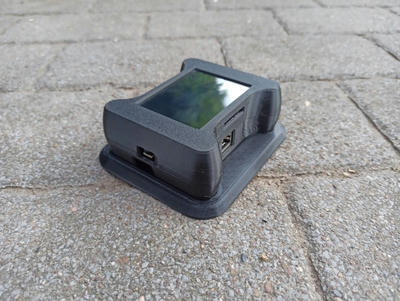
Enclosure for the LCD touch module of the GRBL 32bits board V2.0 from makerfr.com. You can control a CNC machine using the LCD touch module and the main board.
This powerful controller offers versatile connectivity options, such as connecting the LCD module to the main board via cable or wirelessly. To accommodate this, I designed a detachable housing with accessible connectors.
If you need to modify the design, all parts are available as STEP files as well.

Picosplit Keyboard
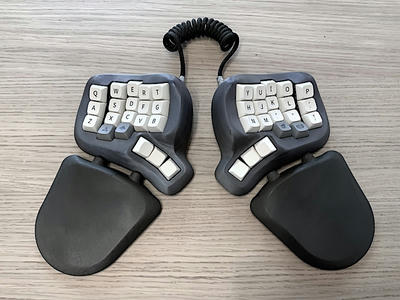
This 3D-printable keyboard, inspired by the Dactyl design, enables a natural and relaxed hand position even during long typing sessions due to its ergonomic shape. It offers interchangeable wrist rests, interchangeable switches and keycaps, a open-source firmware based on CircuitPython, and easy configuration via text files. It provides a time-saving wiring system without diodes and the flexibility to replace the Raspberry Pi Pico with other microcontrollers if needed.
The STL files are hosted on printables
Have you ever thought about how many hours a day you spend in front of the computer with the keyboard? I'm a software developer and for me it's certainly more than 8 hours, because the keyboard is my most important input tool. I can't write software without it. Even though that's the case, for years - decades, actually - I typed with just a few fingers. I kept glancing back and forth between the keyboard and the screen.
My typing speed was okay, but the constant glances got in the way and therfore I started to learn the 10-finger typing system. I even started doing it several times, because I never lasted long. Mainly for two reasons:
- I got pain in my wrists.
- The keys on a normal keyboard are offset and I often had trouble hitting the right keys.
I therefore tried different ergonomic keyboards. In the end, I found split keyboards to be the best, because I can always arrange them so that my wrists are in a relaxed position. I like it even more when the keyboard halves are slightly raised, so that my hands are not completely flat on the keyboard. For me, this is the optimal hand position and the PicoSplit keyboard has such an inclination already built in.
Most split keyboards do not have keys in rows that offset horizontally from each other. This seems to solve my second problem as well. But often these keyboards have much less keys than you are used to. On one hand, this is good because the muscle memory has to remember fewer positions and the hands don't have to move so far. On the other hand, you can only emit the missing keys by activating layers. A layer has its own key assignment for each key.
That's why keyboard layout matters. As much as I liked my first split keyboard (it was the Kyria from Splitkb.com), I was undecided about the layout until one day I found the Miryoku layout.
![]()

The layout has very few keys and it is so well thought out that you can really type all characters of a normal keyboard with it. The basic layout corresponds to the English Colemak layout. There is also a qwerty variant, which I use in a slightly modified form in the PicoSplit keyboard:
![]()

You can change the layout of the PicoSplit with a text editor and without having to install any development environment. The firmware is based on CircuitPython which provides, beside the USB keyboard, a USB memory drive. Not only the configuration files are on this drive, but also the whole PicoSplit firmware in form of Python scripts.
Features
- 3D-printable with common FDM printers.
- Its shape is inspired by the Dactyl keyboard.
- Allows you to keep your hands natural and relaxed, even after hours of typing.
- Interchangeable wrist rests that magnetically dock to the keyboard.
- Adjustable distance between keyboard and wrist rests.
- Keyboard and wrist rests can be magnetically attached to a surface.
- Keyboard halves snap together for transport.
- Switches and keycaps are interchangeable.
- The PicoSplit keyboard firmware is open source and based on CircuitPython.
- Readable configuration file format.
- Easily modifiable firmware
- Time-saving system for wiring the switches without having to use diodes.
- No need to install any other software on your computer.
- A simple text editor is all you need to modify the keyboard layout.
- A layout that reduces finger travel a lot is already included. It is inspired by the Miryoku layout.
- The Raspberry Pi Pico can be replaced by something else thanks to slide-in modules.
Limitations
The PicoSplit firmware is based on CircuitPython. Currently USB keyboards created with CircuitPython do not work in all situations. For example: On my Intel iMac (macOS 11.x), I can not enter the login password if the hard disk is encrypted and waking up that Mac from sleep by pressing a key on the PicoSplit does not work (see discussion). You may encounter similar problems on Windows and Linux. On the other hand, I can use the PicoSplit with a M1 MacBook without problems and it works with my iOS and Android devices. So it depends.
Overview
3D printed parts
The plastic parts are easiest to print with PLA. A keyboard case weighs about 200g including support material. A wrist rest weighs about 100g. All parts together weigh a little under 600g. This includes 120g for support material. I have had good experiences with PolyTerra PLA. It's not expensive, has a nice matte finish, and prints easily. I printed the parts you see here with that material.
Magnets
40 neodymium magnets measuring 10 x 2mm. These will fit: Magenesis Neodymium 10x2 mm 52 pieces Mini Magnets Extremely Strong approx. 2 kilo adhesive strength, 10 x 2 mm : Amazon.com: business, industry & scienceYou'll need at least 40 neodymium magnets measuring 10 x 2mm. These will fit: Magenesis Neodymium 10x2 mm 52 pieces Mini Magnets Extremely Strong approx. 2 kilo adhesive strength, 10 x 2 mm : Amazon.com: business, industry & science
Rubber feet
Rubber feet not only prevent the keyboard from slipping, but also serve as a buffer between the keyboard and the wrist rest. The optimal shape for the buffer rubber is a ball section with a base diameter of about 9-10mm. This shape is also good for the feet, as it is more slip-resistant than other shapes. Therefore, I recommend these feet for both purposes: SAIYU Rubber Feet Pads 100 Pieces Adhesive Bumper Pad Silicone Bumper Foot Protector Pad (100 Pieces, 9mm x 3mm, Black, Hemispherical Shape) : Amazon.com: hardware store
Screws
30 x M2 x 5mm screws. Single screws are hard to get, but in this set they are included: 800 pieces M2 black carbon steel with countersunk head and flat cross head, self-tapping screws, machine screws, fasteners, repair tools : Amazon.com: Hardware Store
Raspberry Pi Pico
You need two Raspberry Pi Pico microcontrollers. Some suppliers also offer pin headers. You don't need these pin headers. I bought mine here: Raspberry Pi Pico - Welectron
Glue
The magnets and the TRRS sockets are fixed with glue. A great alternative to epoxy is viscous superglue. This one works great: Pattex PSPP3 superglue Perfect Pen 3 g, black, 1 x 3g : Amazon.de: Baumarkt
Wire
You need at least 4.50 meters of copper wire with a diameter of 0.5 mm. It does not have to be in different colors, as shown in the picture above, but make sure that the cable does not consist of many small strands, but has a solid copper core.
TRRS jack
You need two TRRS jacks. Stores who offer accessories for do-it-yourself keyboards often have them as well: 2x TRRS jacks 3.5mm | Parts | Keyboard Parts | Keycapsss
TRRS cable
The TRRS cable is used to connect the two halves of the keyboard. One is enough. It should have a length of at least 30 cm, so that you can place the keyboard halves far apart if necessary: TRRS Cable 4-pole 3.5mm jack 30cm 12inch | Accessories | Keycapsss
Micro-USB cable
One of the Raspberry Pi Picos is connected to the computer with a Micro-USB cable. For example, with this one: Amazon Basics 7T9MV4 Connecting Cable, USB 2.0, USB-A male to Micro-USB-B male , 1.8 m, Black: Amazon.com: Computers & Accessories
Keys
You need a total of 40 mechanical keys. The selection is huge and everyone probably has their own idea of the perfect key. I've tried a lot. I like the sound of self-oiled Glorious Panda switches, for example. The Gazzew Boba U4 are very quiet but with a great pressure point. I also tried the Kailh Low Profile Choc Switches (V1). They also fit into the PicoSplit keyboard . But keep in mind that low-profile keys don't stick out that far, and at least that's inconvenient for the thumb keys. You may have to put something under the corresponding keycaps in order to fix this.
Here are a few links to German retailers who offer keys and keycaps:
Keycaps
You need just as many keycaps as there are keys, i.e. 40 pieces. The keycaps must mechanically fit the keys and they must all be 1U keys (the smallest size). Most manufacturers copy the Cherry MX system and there is a huge variety in this universe.
Keycaps come in different shapes:
![]()

Kailh Low Profile Choc Keys (V1) also fit, but there are significantly fewer keycaps for this system and you need to raise the thump keycaps a little bit. Therefore I can not recommend these switches.
The keycaps used in this building instructions can be found on Aliexpress: [milk honey keycaps - Buy milk honey keycaps with free shipping on AliExpress version] (https://de.aliexpress.com/af/milk-honey-keycaps.html?d\=y\&origin\=n\&SearchText\=milk+honey+keycaps\&catId\=0\&initiative\_id\=AS\_20211003054555)
Hot swap sockets
You need 40 hot swap sockets to match your keys. These sockets are actually intended for mounting on circuit boards, but they also make manual wiring easier in the PicoSplit keyboard. On one hand, they stabilize the buttons' pins, which are prone to kinking, and on the other hand, they offer a larger soldering surface, which simplifies the soldering of the cables. Only with hot swap sockets, you are able to swap the buttons as you like. You can get hot swap sockets here: [Kailh Hotswap PCB Sockets 10 pcs | Parts | Keyboard Parts | Keycapsss] (https://keycapsss.com/keyboard-parts/parts/49/kailh-hotswap-pcb-sockets-10-pcs?number\=KC10019\_MX)
Make sure to choose sockets that fit your keys (MX or Choc system).