Parts list
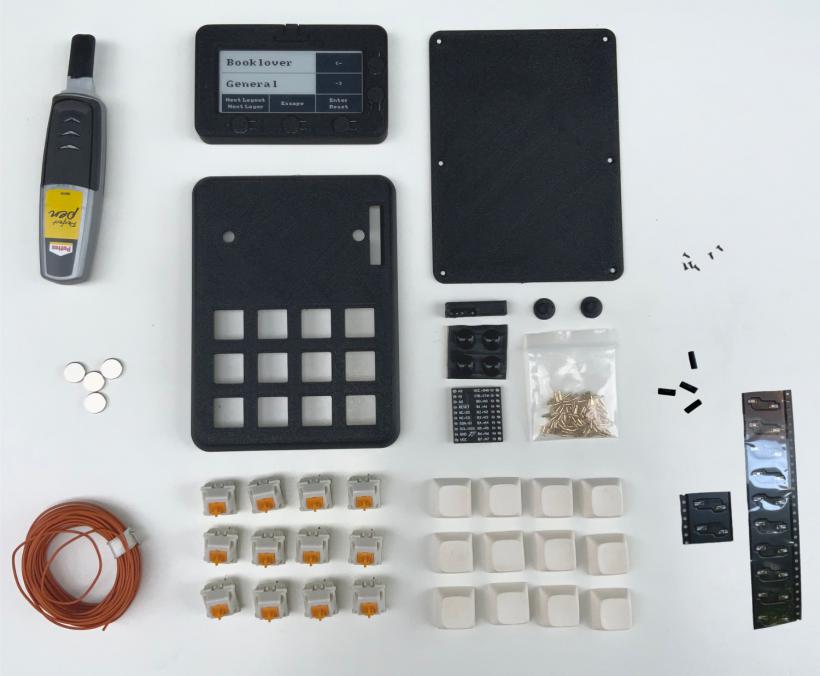
Here are all the parts you need for the keypad.
Badger enclosure
Build the Badger 2040 enclosure first. See Badger 2040 Enclosure
Plastic parts
Get the STL files from printables.com and print them. Make sure that the connector fits tightly into the opening provided for it in the upper part of the keypad. You may have to experiment a bit with your print settings until it fits.
Electronic parts
You need a MCP23017 module which is a 16-Bit I/O-Expander. I bought mine from ebay: https://www.ebay.de/itm/154938928049?hash=item2413146bb1:g:Aj0AAOSwJCZiUE7b
Unfortunately, there is no supplier who sells individual Pogo Pins. We only need four of them. These ones fit: https://www.amazon.de/gp/product/B07FPMQ6ZC/ref=ppx_yo_dt_b_asin_title_o08_s00?ie=UTF8&th=1
I know they are a bit expensive. You can also build the keyboard without the Pogo pins, and just use a cable with a Qwiic connector instead (https://shop.pimoroni.com/products/jst-sh-cable-qwiic-stemma-qt-compatible?variant=31910609879123). In that case, the cable is fed through the connector hole and plugged into the socket on the back of the badge. If you want to do it this way, you don't need to print Connector.stl. But I recommend the variant with the Pogo Pins, because the Qwiic socket on the badge is not meant to be plugged in and out all the time. The socket can easily be damaged and it is not so easy to detach the badge from the keypad.
Keys and related parts
You need twelve mechanical keys. Both MX-style keys and low profile keys from Kailh fit into the keypad. And also twelve matching keycaps in the color of your choice. You don't necessarily need them, but I recommend key sockets, so you can change the keys later. They also make it easier to solder the cables to the keys, because they have a larger soldering area. I order my keys, keycaps and sockets here:
Wiring
You need some hookup wire with a cross section of 0.2mm², some solder and a soldering iron.
Heat shrink tubing
Short pieces of heat shrink tubing are put over the pogo pin connections. It is mainly a visual improvement because the pogo pins can be seen from the side. Use a color that matches your case.
Magnets
At least four 10x2 mm magnets. These are the same magnets that are used inside the enclosure. The magnets are available here: https://www.amazon.de/Neodym-Magnete-Stück-Extrem-Haftstärke/dp/B06X977K8L/ref=sr_1_5?__mk_de_DE=ÅMÅŽÕÑ&dchild=1&keywords=Magenesis+Neodym+10x2+mm+52+Stück&qid=1633262257&sr=8-5
Rubber feed
Rubber feet prevent the keypad from slipping. I use these feet: SAIYU Rubber Feet Pads 100 Pieces Adhesive Bumper Pad Silicone Bumper Foot Protector Pad (100 Pieces, 9mm x 3mm, Black, Hemispherical Shape) : Amazon.com: hardware store
Screws
You need six 2 mm screws with a pointed tip with a length of about 5 mm. I bought a set, because I need those screws for other projects too: https://www.amazon.de/Karbonstahl-selbstschneidende-Maschinenschrauben-Befestigung-Reparaturwerkzeug/dp/B07T5WX7HY
Glue
Thin liquid super glue